Mastering Remote Access To Your Raspberry Pi Via SSH
Unlock the potential of managing your Raspberry Pi projects remotely using SSH, enhancing your workflow and efficiency. Whether you're a beginner or an advanced user, this guide will walk you through the essentials of setting up and utilizing SSH effectively. By the end, you'll have the tools and knowledge to confidently access your Raspberry Pi from anywhere.
Remote access to your Raspberry Pi is not merely a convenience—it's a necessity for many users. Whether you're administering servers, automating home systems, or running IoT projects, SSH (Secure Shell) provides a secure and dependable method to connect to your device from any location across the globe. This technology empowers you to manage your projects without the need for physical access.
This comprehensive guide will lead you through the setup process, troubleshooting tips, and best practices, ensuring your remote connections are secure and efficient. By the time you finish reading, you'll be fully equipped to harness the power of SSH for remote Raspberry Pi access.
Read also:Exploring The Influence And Achievements Of Kim Kylie And Kendall
Table of Contents
- Understanding SSH
- Activating SSH on Raspberry Pi
- Establishing a Remote Connection
- Utilizing SSH Clients
- Customizing SSH Settings
- Enhancing SSH Security
- Addressing SSH Issues
- Exploring Advanced SSH Features
- Best Practices for Remote Access
- Final Thoughts
Understanding SSH
SSH, or Secure Shell, is a cryptographic network protocol designed to provide secure remote access to networked devices. Widely adopted in the tech industry for managing servers, automating tasks, and securely transferring files, SSH has become an indispensable tool for Raspberry Pi users. It allows you to control your device remotely without requiring physical presence.
The standout feature of SSH is its ability to encrypt all data transmitted between your computer and the Raspberry Pi, safeguarding sensitive information from unauthorized access. This encryption ensures that your remote management activities remain protected, making SSH the go-to choice for managing Raspberry Pi projects securely.
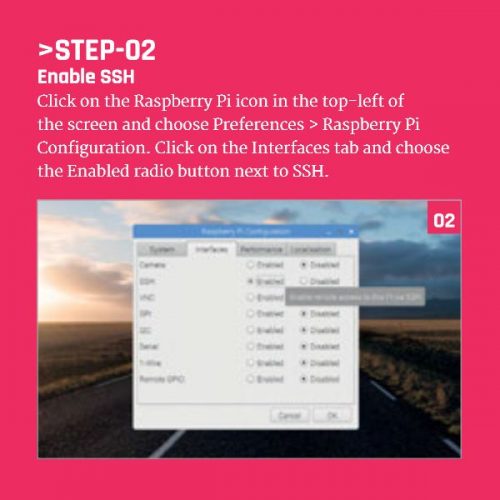
Activating SSH on Raspberry Pi
Step-by-Step Guide to Enable SSH
To access your Raspberry Pi remotely, you must first enable SSH on the device. Follow these straightforward steps to activate SSH:
- Start by booting up your Raspberry Pi and logging into the operating system.
- Open the terminal and type
sudo raspi-configto launch the Raspberry Pi Configuration tool. - Navigate to the "Interfacing Options" menu and select "SSH."
- When prompted, choose "Yes" to enable SSH and confirm your selection.
- Reboot your Raspberry Pi to apply the changes and ensure SSH is active.
Alternative Method: Using a Blank File
If you're configuring SSH on a headless Raspberry Pi (without a monitor or keyboard), you can enable SSH by creating an empty file named "ssh" on the boot partition of your SD card. Simply insert the SD card into your computer, create the file, and reinsert it into the Raspberry Pi. SSH will automatically activate upon booting.
Establishing a Remote Connection
Identifying Your Raspberry Pi's IP Address
To initiate a remote connection, you must know your Raspberry Pi's IP address. You can retrieve this information by running the command hostname -I in the terminal. Once you have the IP address, you can use it to establish an SSH connection from another computer.
Connecting from a Linux or macOS Computer
Linux and macOS users can utilize the built-in terminal to connect to their Raspberry Pi. Open the terminal and enter the following command:
Read also:Why You Should Join Wewillwritecom Today Unlock Your Writing Potential
ssh pi@YOUR_RASPBERRY_PI_IP_ADDRESSReplace "YOUR_RASPBERRY_PI_IP_ADDRESS" with the actual IP address of your Raspberry Pi. When prompted, input the password for the "pi" user (default is "raspberry") to gain access.
Utilizing SSH Clients
Popular SSH Clients
Windows users have several SSH clients available to facilitate remote connections. Some of the most popular options include:
- PuTTY: A free and widely-used SSH client that offers an intuitive interface for connecting to remote devices.
- Windows Terminal: The built-in terminal in Windows 10 and 11 supports SSH connections directly, eliminating the need for third-party software.
- MobaXterm: A robust SSH client that includes additional features like file transfer and session management, enhancing your remote access experience.
Connecting with PuTTY
To connect to your Raspberry Pi using PuTTY, follow these steps:
- Download and install PuTTY from the official website.
- Launch PuTTY and input your Raspberry Pi's IP address in the "Host Name" field.
- Select "SSH" as the connection type and click "Open" to establish the connection.
- Log in using the "pi" username and the default password ("raspberry") to access your Raspberry Pi.
Customizing SSH Settings
Modifying the SSH Configuration File
The SSH configuration file, located at /etc/ssh/sshd_config, allows you to tailor various settings to meet your specific requirements. To edit the file, use the following command:
sudo nano /etc/ssh/sshd_configSome common customizations include changing the default port, disabling password authentication, and enabling key-based authentication. These adjustments can enhance security and streamline your remote access experience.
Restarting the SSH Service
After making changes to the configuration file, you must restart the SSH service for the modifications to take effect. Use the following command to restart the service:
sudo service ssh restartEnhancing SSH Security
Implementing Key-Based Authentication
Key-based authentication offers a more secure alternative to password-based authentication. To set it up, follow these steps:
- Generate an SSH key pair on your local machine using the command
ssh-keygen. - Copy the public key to your Raspberry Pi using the command
ssh-copy-id pi@YOUR_RASPBERRY_PI_IP_ADDRESS. - Disable password authentication in the SSH configuration file by setting
PasswordAuthentication no.
Changing the Default SSH Port
Modifying the default SSH port (22) can help mitigate the risk of brute-force attacks. To accomplish this, edit the SSH configuration file and adjust the "Port" setting to a different number (e.g., 2222). Remember to update your firewall rules to allow traffic on the new port.
Addressing SSH Issues
Common SSH Problems and Solutions
Even with meticulous setup, SSH connections can occasionally fail. Below are some common issues and their corresponding solutions:
- Connection Refused: Verify that SSH is enabled and that the Raspberry Pi is properly connected to the network.
- Permission Denied: Double-check the username and password. If using key-based authentication, ensure the public key is correctly installed on the Raspberry Pi.
- Timeout Errors: Examine your network connection and confirm that the Raspberry Pi's IP address is accurate.
Using SSH Logs for Debugging
The SSH logs, located at /var/log/auth.log, provide invaluable insights for diagnosing connection issues. Use the following command to review the logs:
sudo tail -f /var/log/auth.logExploring Advanced SSH Features
SSH Tunnels and Port Forwarding
SSH tunnels enable you to securely forward network traffic between your local machine and the Raspberry Pi. This functionality is particularly useful for accessing services running on the Raspberry Pi, such as web servers or databases. To establish an SSH tunnel, use the following command:
ssh -L LOCAL_PORT:localhost:REMOTE_PORT pi@YOUR_RASPBERRY_PI_IP_ADDRESSSSHFS for Remote File Access
SSHFS (SSH Filesystem) allows you to mount a remote directory on your Raspberry Pi as though it were a local drive, simplifying file transfers and management. To install SSHFS on a Linux system, use the following command:
sudo apt-get install sshfsSubsequently, mount the remote directory using:
sshfs pi@YOUR_RASPBERRY_PI_IP_ADDRESS:/remote/path /local/pathBest Practices for Remote Access
Regularly Update Your Raspberry Pi
Maintaining up-to-date software on your Raspberry Pi is critical for ensuring security and stability. Use the following commands to update your system:
sudo apt-get update && sudo apt-get upgradeMonitor SSH Activity
Regularly reviewing your SSH logs can help identify unauthorized access attempts. Consider setting up alerts or utilizing tools like Fail2Ban to automatically block suspicious IP addresses, further securing your remote access environment.
Final Thoughts
Accessing your Raspberry Pi remotely via SSH unlocks a wealth of possibilities for managing and expanding your projects. By following the steps outlined in this guide, you can confidently set up and secure your SSH connections, ensuring a reliable and efficient remote access experience. We encourage you to share your experiences and insights in the comments section below. If you found this article helpful, don't hesitate to share it with your friends and colleagues. For more tips and tutorials, explore our other articles on Raspberry Pi and related technologies.


